Showing posts with label stop motion trick. Show all posts

Monday, December 20, 2010

50+ Incredible & Stunning Stop Motion Animation Videos & Tutorials

Hi guys i have already posted about the tutorial of stop moion animation. Today i came across some of the stunning stop motion animation videos from various websites, but i really felt uncomfortable with those videos because they were not ranked so. So i thought ranking it according to my own view because i was able to find some high quality videos in them. But before going to top fifty videos i thought of giving you some basic information and tips for the stop motion animation which is given below:

Stop motion Technique is a simple and very creative hobby. You may think that it is really expensive, but its not like that its just a inexpensive only you need is a typical digital camera and some software with creative ideas.
The Important thing in that stop motion animation is digital camera because animators should be well versed with the camera and they should have creative ideas in shooting the pictures. Likewise by moving the camera with different angle will help you to make you animation an amazing one and stand out.

But this animation has a draw back that because it sometime times appear to b 'strobe' partly due to blur between the frames.

TWO DIMENSION STOP MOTION ANIMATON TECHNIQUE:
Working in two dimensions gives you a lot of creative and inexpensive options. You can simply draw pictures on paper and erase then redraw them to show the motions you want to make. An alternative to erasing is to draw series of pictures on separate sheets of paper and photograph them individually. This can give you extraordinary results but is very challenging to make sure the images stay cleanly tracked without slippage which would make it very jerky and shaky.


An excellent way to draw pictures is to use some kind of an erasable surface. This tends to be much easier than drawing pictures on paper and two excellent mediums for this are the dry erase board and the chalkboard. These make it very easy to erase potions of your drawing and redraw the motions. I highly recommend using a dry erase board if you want to get some great looking animations and if you have some skill in drawing.

Drawing images of figures and objects then cutting them out and using them in animations is an excellent way to get very creative and very expressive animations. There are two important additions you can make to this style of animation. You can cut the drawing into segments to show motion. An example of this would be to draw a human form then cut it into its different parts like arms, legs, head and torso. This way you can move them individually much as a human moves. Another way to enhance cut out drawings is to make multiple drawings of the same object to show motion or rotation. A good example of this would be a face. You would draw multiple faces such as one with the mouth closed and one with the mouth open. This way you can alternate between the drawings and simulate talking.

I mean, watch some of these below and tell me you’re not inspired! And when you’re done, let us know in the comments which ones you liked best (my personal favorite one is the break dancing one).


Ten Thousand Pictures of You from Robin King on Vimeo.


This Is Where We Live from 4th Estate on Vimeo.


Science Machine from Chad Pugh on Vimeo.


Mykonos from Sean Pecknold on Vimeo.


The North Wind Blew South from Keith Loutit on Vimeo.


White Winter Hymnal from Sean Pecknold on Vimeo.


Nice Clean White from DaBrainkilla on Vimeo.


Bed Head Stop Motion from Kendall Hunt on Vimeo.


Light-Paint Piano Player from Ryan Cashman on Vimeo.


8sks - City from wemakesoap on Vimeo.


Stop Motion / Photography from Neylano on Vimeo.


Spinning Rocks Stop Motion from lunalady on Vimeo.


stop motion_01 from guillaume Noue on Vimeo.

Thursday, December 16, 2010

Best Stop Motion Animated Video & Tutorial For Creating Videos

Hi friends today I thought providing you some attractive tips for creating a stop motion animated videos. Actually we all know that stop motion animation is a very very basic technique.Here is small video which I have taken from You tube in order to show you how you tube animated videos are made.

Video
By seeing this insipiration video I know that all will be eager to make a stop motion animation video. So its my pleasure to provide you this basic tutorial how can you make animation video.
Try these steps in order to make a perfect stop motion animation video
which are as follows:


What You’ll Need
The first thing you need is, of course, an idea. Try to stick with something simple for your first one–any action that can be split up into smaller parts works well.
You may wish to make an inanimate object appear as though it is alive; for example, a sock inching its way across the floor or a piece of paper that crumples itself up. While brainstorming, keep in mind that you can expect to shoot around 10 photos for every second of film.
Second, you’ll need a digital camera. Since you won’t be printed these photos, you can set your camera to the lowest size image setting. This will let you fit more images on your memory card at a time. Depending on how long you’d like your movie to be, you may need to “fill and dump” your camera (copying the photos to your computer and erasing the memory card) multiple times before you are finished.
Finally, in order to turn your images into an animated video you will need video editing software like Apple’s iMovie or QuickTime Pro. There are also a number of free and shareware programs for Mac, Windows, and Linux, some of which are listed at the end of this tutorial. More information about these programs is available on their respective websites.
Step 1: Shoot Your Animation
Let’s say, for example, that you would like to make that sock move itself across the floor. Start at the beginning: place the sock somewhere and take your first photo. Remember, you want to use camera (still frame) mode, not movie mode.
Using a tripod and only moving your object will make it appear as though your object is moving through your frame. Keeping the object in the same general area in each frame by moving the camera along with it will make it appear as though you are traveling with the object. It’s up to you.
After you’ve taken your first photograph, move the sock slightly in the direction you want it to travel and take another photo. Move it again by the same distance, and take one more. Continue this until the sock reaches where you want it to stop. You can manipulate your object in creative ways to add visual interest to your film, just make sure that whatever movement your object makes is done slowly over several frames.
Finally, if you make a mistake while shooting, delete that picture on your camera and take another. This will save you from having to edit your film later.
Step 2: Download Your Photos
Now that you’ve captured your images, you’ll need to get them onto your computer. This process varies widely from camera to camera and computer to computer. Consult your camera guide and software “Help” if you are unfamiliar with this process. We’ll be using iPhoto and iMovie for the Mac, but you should be able to do the same with the Windows and Linux software listed at the end of this tutorial.
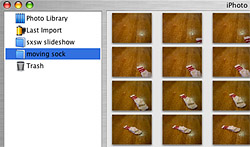
First, import your image files to iPhoto from the camera, and give them their own album. Once your photos have been imported, close iPhoto and open iMovie.


Step 3: Find Your Photos in iMovie

Create a new iMovie project and call it whatever you like.
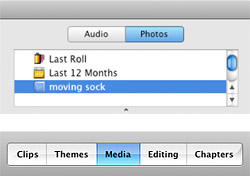
Now click on the “Media” button to the right above your timeline and select “Photos” at the top right of the window. (On older versions of iPhoto, you’ll click the “Photos” button instead of the “Media” button.)
Select your stop-motion album. All of your photos should now appear in order.

Step 4: Animate Your Photos

In order for your animated short to play properly, you must tell iMovie how long you want each photo to appear before showing the next one. It’s kind of like creating a slideshow, except instead of giving each image a few seconds, you give it only a fraction of a second. The timing you choose will affect the overall tempo and length of your film.
For our sock example we used a duration of 3 frames-per-photo. Since videos you create in iMovie usually play at 30 frames-per-second, a setting of 3 frames-per-photo means you’ll see 10 photos every second. Now you can see why you have to shoot so many photos!
If you use the 3 frames-per-photo setting, you can easily estimate how many photos you’ll need to create a movie of a given length. In our example we used around 100 photos, for 10 seconds of video. If we wanted to make an animation exactly 30 seconds long, we’d shoot 300 photos.
Time in iMovie appears in “0:00″ format (see figure 3). The number before the colon is the number of seconds and the number after the colon is the number of frames (so 3 frames-per-photo looks like this “0:03″).
This next step is very important, so stay with us! In iMovie, select all of the photographs in your stop-motion album (the quick way to do this is to click on the very first photo and then, holding down the shift key, scroll down and click on the last photo.) Now click “Show Photo Settings” and type in “0:03″ for your duration in the floating window that appears. Click the Apply button and your photos will start getting sucked into the timeline at the bottom of the window. [Older versions of iPhoto let you set the duration in your editing window without clicking "Show Photo Settings."]
Once iMovie’s finished filling the timeline, hit play.
You just created your first stop-motion animated video short!

Final Touches: Music and Sharing

To fine tune your animation, you can slow it down by choosing to use more than 3 frames-per-photo. You can also add music to your short by dragging MP3s or AIFF files to the timeline, or browsing your iTunes library from within iMovie.
To share your stop-motion video, you’ll want to convert it to QuickTime. The steps in this process depend on which version of iMovie you are using. In general, look for “Export” or “Share” options, and try one of the default options. If you want to get more advanced, start by trying “Sorenson 3″ as your codec for good quality and decent file size. Your iMovie help section will have more detail on exporting to Quicktime.