Video
By seeing this insipiration video I know that all will be eager to make a stop motion animation video. So its my pleasure to provide you this basic tutorial how can you make animation video.
Try these steps in order to make a perfect stop motion animation video
which are as follows:
which are as follows:
What You’ll Need
The first thing you need is, of course, an idea. Try to stick with something simple for your first one–any action that can be split up into smaller parts works well.
You may wish to make an inanimate object appear as though it is alive; for example, a sock inching its way across the floor or a piece of paper that crumples itself up. While brainstorming, keep in mind that you can expect to shoot around 10 photos for every second of film.
Second, you’ll need a digital camera. Since you won’t be printed these photos, you can set your camera to the lowest size image setting. This will let you fit more images on your memory card at a time. Depending on how long you’d like your movie to be, you may need to “fill and dump” your camera (copying the photos to your computer and erasing the memory card) multiple times before you are finished.
Finally, in order to turn your images into an animated video you will need video editing software like Apple’s iMovie or QuickTime Pro. There are also a number of free and shareware programs for Mac, Windows, and Linux, some of which are listed at the end of this tutorial. More information about these programs is available on their respective websites.
Let’s say, for example, that you would like to make that sock move itself across the floor. Start at the beginning: place the sock somewhere and take your first photo. Remember, you want to use camera (still frame) mode, not movie mode.
Using a tripod and only moving your object will make it appear as though your object is moving through your frame. Keeping the object in the same general area in each frame by moving the camera along with it will make it appear as though you are traveling with the object. It’s up to you.
After you’ve taken your first photograph, move the sock slightly in the direction you want it to travel and take another photo. Move it again by the same distance, and take one more. Continue this until the sock reaches where you want it to stop. You can manipulate your object in creative ways to add visual interest to your film, just make sure that whatever movement your object makes is done slowly over several frames.
Finally, if you make a mistake while shooting, delete that picture on your camera and take another. This will save you from having to edit your film later.
Step 2: Download Your Photos
Now that you’ve captured your images, you’ll need to get them onto your computer. This process varies widely from camera to camera and computer to computer. Consult your camera guide and software “Help” if you are unfamiliar with this process. We’ll be using iPhoto and iMovie for the Mac, but you should be able to do the same with the Windows and Linux software listed at the end of this tutorial.
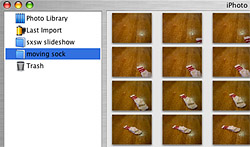
First, import your image files to iPhoto from the camera, and give them their own album. Once your photos have been imported, close iPhoto and open iMovie.
Step 3: Find Your Photos in iMovie
 Create a new iMovie project and call it whatever you like.
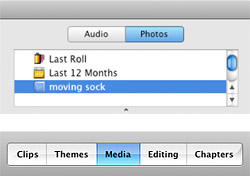
Now click on the “Media” button to the right above your timeline and select “Photos” at the top right of the window. (On older versions of iPhoto, you’ll click the “Photos” button instead of the “Media” button.)
Select your stop-motion album. All of your photos should now appear in order.
Step 4: Animate Your Photos
In order for your animated short to play properly, you must tell iMovie how long you want each photo to appear before showing the next one. It’s kind of like creating a slideshow, except instead of giving each image a few seconds, you give it only a fraction of a second. The timing you choose will affect the overall tempo and length of your film.For our sock example we used a duration of 3 frames-per-photo. Since videos you create in iMovie usually play at 30 frames-per-second, a setting of 3 frames-per-photo means you’ll see 10 photos every second. Now you can see why you have to shoot so many photos!
If you use the 3 frames-per-photo setting, you can easily estimate how many photos you’ll need to create a movie of a given length. In our example we used around 100 photos, for 10 seconds of video. If we wanted to make an animation exactly 30 seconds long, we’d shoot 300 photos.
Time in iMovie appears in “0:00″ format (see figure 3). The number before the colon is the number of seconds and the number after the colon is the number of frames (so 3 frames-per-photo looks like this “0:03″).
This next step is very important, so stay with us! In iMovie, select all of the photographs in your stop-motion album (the quick way to do this is to click on the very first photo and then, holding down the shift key, scroll down and click on the last photo.) Now click “Show Photo Settings” and type in “0:03″ for your duration in the floating window that appears. Click the Apply button and your photos will start getting sucked into the timeline at the bottom of the window. [Older versions of iPhoto let you set the duration in your editing window without clicking "Show Photo Settings."]
Once iMovie’s finished filling the timeline, hit play.
You just created your first stop-motion animated video short!
Final Touches: Music and Sharing
To fine tune your animation, you can slow it down by choosing to use more than 3 frames-per-photo. You can also add music to your short by dragging MP3s or AIFF files to the timeline, or browsing your iTunes library from within iMovie.To share your stop-motion video, you’ll want to convert it to QuickTime. The steps in this process depend on which version of iMovie you are using. In general, look for “Export” or “Share” options, and try one of the default options. If you want to get more advanced, start by trying “Sorenson 3″ as your codec for good quality and decent file size. Your iMovie help section will have more detail on exporting to Quicktime.
No comments:
Post a Comment